Perhaps you're familiar with a technique called focus stacking, or Depth of Field (DOF) blending- a multiple exposure technique where a series of images are taken with different focal points. This is done to create a final image with more in focus than a single shot would allow. The first use of this technique was in the sciences, for documentary shots of very small objects such as insects or microscopy. It has since become popular with macro art photographers, and as of late it's been popping up in landscape photography.
With macro subjects of flowers and insects, depth of field is incredibly thin- even with small apertures. The benefits of focus stacking are pretty obvious for this sort of photography. Yet, with a wide angle lens, DOF is already quite large. So why would you want to use a complicated technique, when you can just back up a little and get everything sharp? The main reason is compositional flexibility. Sometimes in a technical art such as photography, your equipment can limit your creativity. DOF stacking can allow you more freedom. If you use a wide lens, you already know that position is absolutely critical to composition. Using DOF stacking and a 14-24 mm, I can get within inches of a mossy rock, stream, or icy pool, turning tiny details into leading lines or eye catching, interesting shapes. If I get close enough, the entire bottom third of a vertical shot will be a patch of ground about the size of a magazine, with the background still able to include a good size mountain range! This allows an enormous amount of compositional variation. If you haven't tried it, give it a whirl. What's the worst that could happen? :)
The basic method I use is as follows- first, I find my composition with a combination of either looking through viewfinder/live view or test shots. Next, I set up my tripod to accommodate the comp. (Don't be tempted to do the reverse- setting up a tripod and then looking for comps will make you miss a lot of great options with a wide lens!) By the time I find what I'm looking for, my tripod is often fully collapsed and my lens is quite close to the ground. Even a movement of a few inches completely changes the composition. I look for strong leading lines, repeating patterns, and subjects that will complement my background subject. Once I'm happy with everything, I take the series of shots. (Manual focus) The first shot is always focused to infinity. Next, I focus a bit closer, while leaving enough overlap of sharp areas to allow easy blending. I repeat this until every part of the composition is in focus for at least one exposure. I find that I can cover the entire possible focal range of the 14-24 2.8 Nikkor lens (at 14mm/f16) using 5 shots. Some pros use only 3 shots, but I'm not quite that confident in my manual focusing yet! :) Note that many lenses zoom out a bit as they focus closer, so allow a little wiggle room in your composition for cropping later. And finally, be aware that a flat subject such as rock or ice will lend itself to much easier blending than a bunch of flowers blowing in the wind- for reasons of both motion, and the added complexity of blending subjects that are separated from the background by a large distance.
Once the images are in the computer, I make any RAW adjustments to all files simultaneously. I then stack all the images on top of each other in Photoshop. I use either auto or manual alignment to line everything up. The final step is hand blending with masks. (Personally, I haven't had much luck with the auto blend in Photoshop, or any other automated focus stacking software.) Manually blending the images can be quite easy and quick, or incredibly painful and slow- it mostly depends on your subject matter and proficiency with masks. A hard edged brush with 100% opacity is a good start. Take your time and check everything twice, it's easy to miss spots.
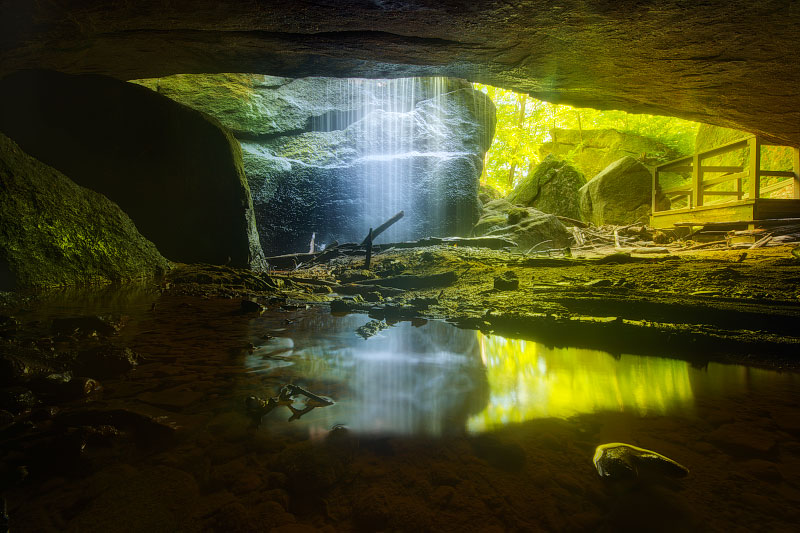
DOF blend to capture reflection in a very small pool of water. Nelsons Ledges, Ohio.
When I started using DOF blending in my own photography, there was a lot of hit-or-miss experimentation. Every DOF stacking calculator was for macro stuff and rather useless for wide angles. Having a bit of free time one day, I made an Excel calc that allowed me to put in desired aperture/focal length, and get a suggested set of images to take. Keep in mind that wide angle DOF stacking does not require the use of this, or any other calculator. Getting out there and learning how your particular lens works in various situations is the best method for mastery. Still, if you'd like a general set of guidelines to use starting out, want to test out specialized nighttime configurations, or just want to see what 5 shots at 600mm/f11 will getcha- I hope you find it helpful.
Some useful links-
Master of DOF blending and dark overlord of editing in general, offers advanced online workshops that are in depth and incredibly helpful. Also kind of sassy, which I appreciate.
Another guy with painfully good photo skills, has a series of editing videos that cover DOF blending and a ton of other stuff.
As stated above, there is no substitute for learning in the field. Marc doesn't have any online vids, tutorials, blogs, or facebooks- but the tours he offers are unlike any others. I went and it was definitely one of the best things I have done for my photography.
And final disclaimer- nope, none of these guys gave me any money. I recommend them because I've personally benefitted from their knowledge, that is all. :)
The space between the ice on the left and right of the foreground is about 10 inches. The waterfall in the upper frame is at least 70 ft tall!
Unedited overview of the area from the first shot. This is from "standard" tripod height IE eye level. The foreground from this height didn't do much for me, but getting close allowed 3 or 4 interesting perspectives to choose from.